
ESP8266 with co2 sensor and MQTT client
28 Nov 2021I just have to write about my latest project. A bit more hardware related and no Linux stuff. The airquality in my basement where I have my computer feels bad, so I just had to upgrade my home made co2 sensor.
Hardware
The hardware I am using, I bought everything from ebay.
- Wemos D1 mini
- 0.96" Oled with 128x64 resolution
- CCS811 sensor board, my version includes a HDC1080 temp & humidity sensor
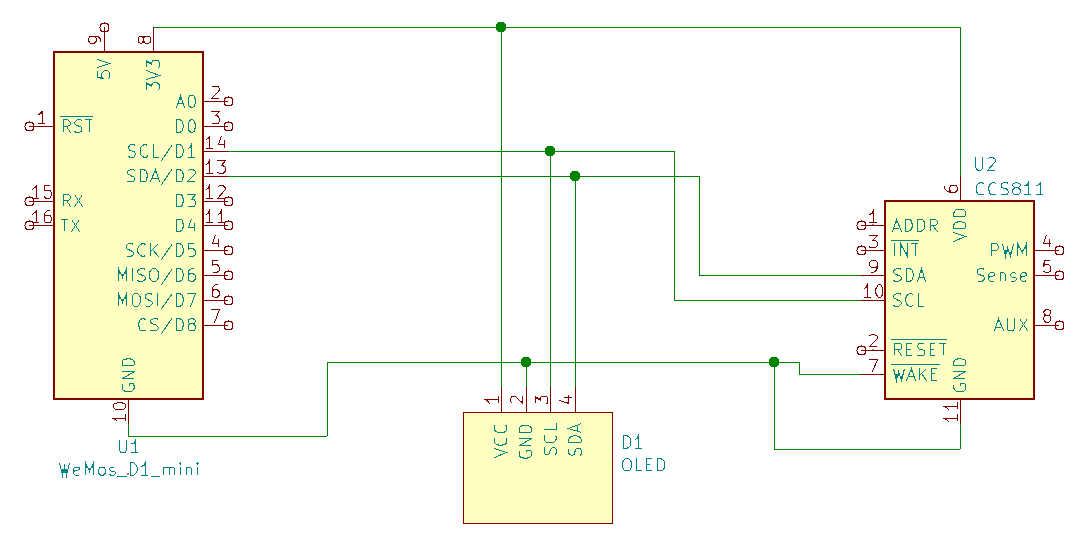
Wiring
This is a quick sketch I made in KiCAD, great software IMO.
Programming
I’m using the Arduino IDE because it is easy to use. But because we are using an ESP8266 we can’t just start writing code and program. We need to install some board stuff so the Arduino IDE know how to program our microcontroller.
Installing ESP8266 to Arduino IDE
There are plenty of guides already, so I will just write a short version.
Go to preferences (file -> preferences)
Add this URL
https://arduino.esp8266.com/stable/package_esp8266com_index.json
to the Additional Boards manager URLs: and click OK
Go to Tools -> Board -> Boards manager...
Search for ESP8266 and press install button for the “ESP8266 by ESP8266 Community“
When the installation is complete you will be able to find the ESP8266 boards under Tools -> Board -> ESP8266
There is a Blink test sketch under File -> Examples if you want to test your board. There are lots of other examples there as well.
Installing libraries
Before we continue we need some libraries for our sensors and oled display.
Go to Tools -> Manage libraries...
Libraries needed
- Adafruit GFX Library
- Adafruit SSD1306
- Adafruit CCS811 Library
- PubSubClient
- ClosedCube HDC1080, for the extra HDC1080 temp sensor on my CCS811 board
Start coding
finally we can start write some code.
Lets start with the includes we need
/*
 * AirQuality Sensor (AQS)
 *
 * Written for D1 Mini (ESP8266), Adafruit_SSD1306 compatible display, ccs811 VOC & co2 sensor and HDC1080 temp & humidity sensor.
 *
 * */
#include <Adafruit_GFX.h>
#include <Adafruit_SSD1306.h>
#include <Adafruit_CCS811.h>
#include <ESP8266WiFi.h>
#include <PubSubClient.h>
#include <ClosedCube_HDC1080.h>
Lets define some local sensor data
const char *SSID = "YOUR_WIFI";
const char *PASSWORD = "YOUR_WIFI_PASSWORD";

const char *mqtt_server = "192.168.30.27"; // Change this to your MQTT server IP
const int mqtt_port = 1883; // Default is 1883
const int mqtt_delay = 10;  // Publish MQTT approx every 10 minutes

const char *hostname = "AQS_1"; // The units LAN hostname
const char *mqtt_str = "AQS/1"; // The MQTT prefix string
Then I like to create a struct to hold my sensor values
    /*
     *  All the data from the sensor.
     */
    struct AQS_SensorData {
      uint16_t eCO2;
      uint16_t TVOC;
      float temp;
      float hum;

      // make sure the values are 0
      AQS_SensorData() : eCO2(0), TVOC(0), temp(0), hum(0) {}
    };
Now lets define some global variables, just because I’m lazy when I write code for my Arduino projects.
/*
 * Global Variables
 */
AQS_SensorData data;

#define SCREEN_WIDTH 128 // OLED display width, in pixels
#define SCREEN_HEIGHT 64 // OLED display height, in pixels
#define OLED_RESET     0 // Reset pin # (or -1 if sharing Arduino reset pin)

Adafruit_SSD1306 display = Adafruit_SSD1306(SCREEN_WIDTH, SCREEN_HEIGHT, &Wire, OLED_RESET);

Adafruit_CCS811 ccs811;
ClosedCube_HDC1080 hdc1080;

IPAddress ip;

// Initializes the espClient. You should change the espClient name if you have multiple ESPs running in your home automation system
WiFiClient espClient;
PubSubClient mqtt(espClient);
I don’t like to write everything into my loop() function, so I have created some functions to be called from my loop(). Because I have the actual function after my loop() in my code I have to define them first.
void read_ccs811();   // Read CCS811 sensor data
void read_hdc1080();  // Read HDC1080 sensor data
void mqtt_connect();  // Connect to MQTT server
void mqtt_publish();  // Publish sensor data to MQTT
void updateDisplay(); // Update display with sensor data
void dumpToSerial();  // Print sensor data to serial port
That’s why I have the global AQS_SensorData data; variable. Then my read_ccs811() function will update the global variable and my updateDisplay() and mqtt_publish() will read the latest values and just publish or display them.
This makes it easy to switch over to use interrupt timers for some parts of the code if you want to.
Finally we are at the setup() function
void setup() {

  Serial.begin(115200);
  delay(500); Serial.println();

  // Print current settings, for debug purpose
  Serial.print("Hostname: "); Serial.println(hostname);
  Serial.print("Mqtt str: "); Serial.println(mqtt_str);
  Serial.print("WIFI: "); Serial.println(SSID);
  Serial.print("Password: "); Serial.println(PASSWORD);
  Serial.print("MQTT srv: "); Serial.println(mqtt_server);
  Serial.print("MQTT port: "); Serial.println(mqtt_port);
  Serial.print("MQTT Delay: "); Serial.println(mqtt_delay);

  // by default, we'll generate the high voltage from the 3.3v line internally! (neat!)
  display.begin(SSD1306_SWITCHCAPVCC, 0x3C);  // initialize with the I2C addr 0x3C (for the 128x32)

  // hdc1080 info
  hdc1080.begin(0x40);
  delay(20);
  Serial.println("------------------------");
  Serial.print("Manufacturer ID=0x");
  Serial.println(hdc1080.readManufacturerId(), HEX); // 0x5449 ID of Texas Instruments
  delay(20);
  Serial.print("Device ID=0x");
  Serial.println(hdc1080.readDeviceId(), HEX); // 0x1050 ID of the device
  delay(20);
  Serial.println("------------------------");
  Serial.print("setup: ccs811 lib  version: "); Serial.println(CCS811_HW_VERSION);
  Serial.println("------------------------");

  Wire.begin();

  // Enable CCS811
  if ( !ccs811.begin() ) {
    Serial.println("setup: CCS811 sensor start error.");
  }

  // Show image buffer on the display hardware.
  // Since the buffer is intialized with an Adafruit splashscreen
  // internally, this will display the splashscreen.
  display.display();
  delay(500);

  // Clear the buffer.
  display.clearDisplay();
  display.display();

  // text display tests
  display.setTextSize(1);
  display.setTextColor(WHITE);

  display.print("Connecting to ");
  display.print(ssid);
  display.display();

  // Connect to WIFI
  WiFi.hostname(hostname);
  WiFi.begin(SSID, PASSWORD);
  while( WiFi.status() != WL_CONNECTED) {
    delay(500);
    display.print(".");
    display.display();
  }
  ip = WiFi.localIP();

  // init MQTT
  mqtt.setServer(mqtt_server, mqtt_port);
}
And then we have the loop() function
void loop() {
  // Update sensor values in our global data variable
  read_hdc1080();
  read_ccs811();

  // Use the global data variable to publish or print
  mqtt_publish();
  dumpToSerial();
  updateDisplay();

  // Just delay 5s
  delay(5000);
}
Now we have all the other functions
void read_hdc1080() {
  data.temp = hdc1080.readTemperature();
  data.hum = hdc1080.readHumidity();
}

void read_ccs811() {
  if ( ccs811.available() ) {
    if ( !ccs811.readData() ) {
      data.eCO2 = ccs811.geteCO2();
      data.TVOC = ccs811.getTVOC();
    } else {
      // readData failed
      Serial.println("ccs811 error, Failed to readData.");
    }
  }
}

void mqtt_connect() {
  // Loop until we're reconnected
  while (!mqtt.connected()) {
    Serial.print("Attempting MQTT connection... ");
    if ( mqtt.connect(cfg.get_hostname()) ) {
      Serial.println("MQTT connected");
      mqtt.publish(mqtt_str, "online");
    } else {
      Serial.print("failed, rc=");
      Serial.print(mqtt.state());
      Serial.println(" try again in 5 seconds");
      // Wait 5 seconds before retrying
      delay(5000);
    }
  }
}

void mqtt_publish() {
  if (!mqtt.connected()) {
    mqtt_connect();
  } else {
    // Call mqtt.loop() to do some background stuff, keep-alive etc.
   if(!mqtt.loop()) {
      Serial.println("mqtt.loop failed");
    }
  }

  if ( mqtt.connected() && mqtt_counter <= 1 ) {
    char buffer[16];
    char msg[128];
    dtostrf(data.eCO2, 1, 4, buffer);
    sprintf(msg, "%s/eCO2", mqtt_str);
    mqtt.publish(msg, buffer);

    dtostrf(data.TVOC, 1, 4, buffer);
    sprintf(msg, "%s/TVOC", mqtt_str);
    mqtt.publish(msg, buffer);

    dtostrf(data.temp, 1, 4, buffer);
    sprintf(msg, "%s/Temperature", mqtt_str);
    mqtt.publish(msg, buffer);

    dtostrf(data.hum, 1, 4, buffer);
    sprintf(msg, "%s/Humidity", mqtt_str);
    mqtt.publish(msg, buffer);

    // The loop() has a 5 sec delay, so it will run approx 60/5 times per minute
    mqtt_counter = (60 / 5) * cfg.get_mqtt_delay();
  } else {
    mqtt_counter--;
  }
}
Just upload and hold your breath :)
Conclusion
My code is very dirty, I feel itchy and it needs a good amount of cleanup before I am satisfied.
But my dirty code is not the biggest problem. The HDC1080 sensor is a huge failure. Sometimes it just works other times it just reports -40 or 125 degrees C. I have read over at the Github repo for ClosedCube_HDC1080 that you need to change the delay() in the readData() function. I have tried without success, today the sensor just works. Few days ago I rebooted and re-uploaded my code like 100 times but the sensor just spit out -40 or 125 degrees C.
So I’m about to throw away my combined CCS811 & HDC1080 sensor board. I just placed an order for a better CO2 sensor, SenseAir S8. And an SHT30 temperature sensor board.